In nlsy-links/NlsyLinks: Utilities and Kinship Information for Research with the NLSY
This vignette will be useful to behavior genetic researchers interested in using the National Longitudinal Survey of Youth (NLSY79) or Children (NLSYC) data. To fit biometrical models to the NLSY or NLSYC requires that the data be extracted from the appropriate online NLSY database into a usable file format. The extracting software is called the NLS Investigator. We describe how to use the NLS Investigator to select and download variables. In subsequent vignettes, we show how to reformat the data into file structures that accommodate behavior genetic research, and how to fit biometrical models. The following steps are not specific to R, but rather precede the use of any analytic statistical software.
options(width = 80)
Terminology
This package considers both Nlsy79 Gen1 and Gen2 subjects. 'Gen1' refers to subjects in the original NLSY79 sample (https://www.nlsinfo.org/content/cohorts/nlsy79). 'Gen2' subjects are the biological offspring of the Gen1 females -i.e., those in the NLSY79 Children and Young Adults sample (https://www.nlsinfo.org/content/cohorts/nlsy79-children). The Nlsy97 is a third dataset that can be used for behavior genetic research (https://www.nlsinfo.org/content/cohorts/nlsy97), although this vignette focuses on the two generations in the NLSY79.
Standard terminology is to refer second generation subjects as 'children' when they are younger than age 15 (NSLYC), and as 'young adults' when they are 15 and older (NLSY79-YA); though they are the same respondents, different funding mechanisms and different survey items necessitate the distinction. This cohort is sometimes abbreviated as 'NLSY79-C', 'NLSY79C', 'NLSY-C' or 'NLSYC'. This packages uses 'Gen2' to refer to subjects of this generation, regardless of their age at the time of the survey.
Steps to Select Variables and Download Data
- Browse to [https://www.nlsinfo.org/investigator]. Select the 'REGISTER' link in the top right, and create a personal account. If you have already registered, Log In and proceed to the next step.
-
Select your desired cohort, in the dropdown box titled, "Select the study you want to work with:''. In the screenshot below, second generation of the NLSY79 sample is selected.

-
Select the variables. There are tens of thousands of variables in some cohorts, and selecting the correct ones can require careful attention and a few tricks. A thorough tutorial begins on the NLS Investigator page: [https://www.nlsinfo.org/content/access-data-investigator/investigator-user-guide]. To better leverage the NLSY's extensive variable set (and to avoid mistakes), we recommend that researchers dedicate time to this tutorial. However for the purposes of this vignette, we'll simply select a few easy variables.
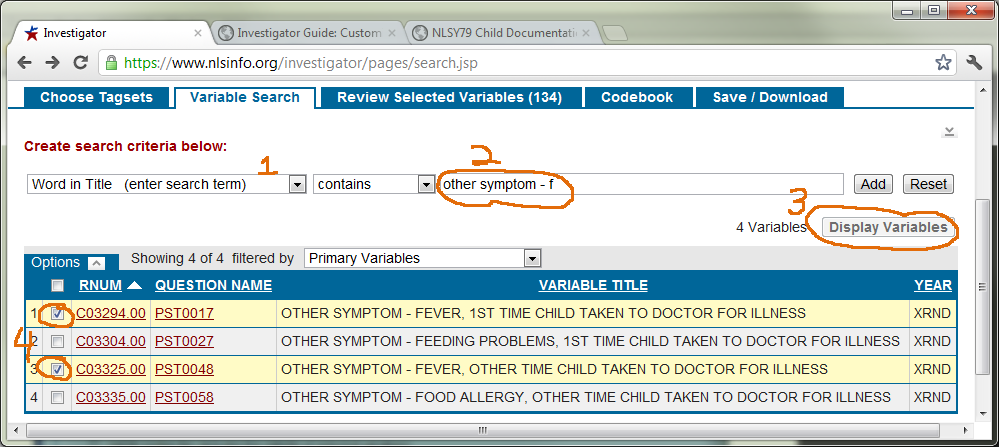
First, in the 'Variables Search' tab, select 'Word in Title (enter search term)'. Second, type "other symptom - f" in the textbox. Third, clicking the 'Display Variables' button should retrieve at least four NLSYC variables whose title starts with "other symptom - f". Fourth, supposing we care about only their fevers, click their two corresponding checkboxes. (If you're curious, the 'XRND' value for year stands for cross round; XRND variables are calculated by the NLS staff, and typically come from the subject's most recent survey).
-
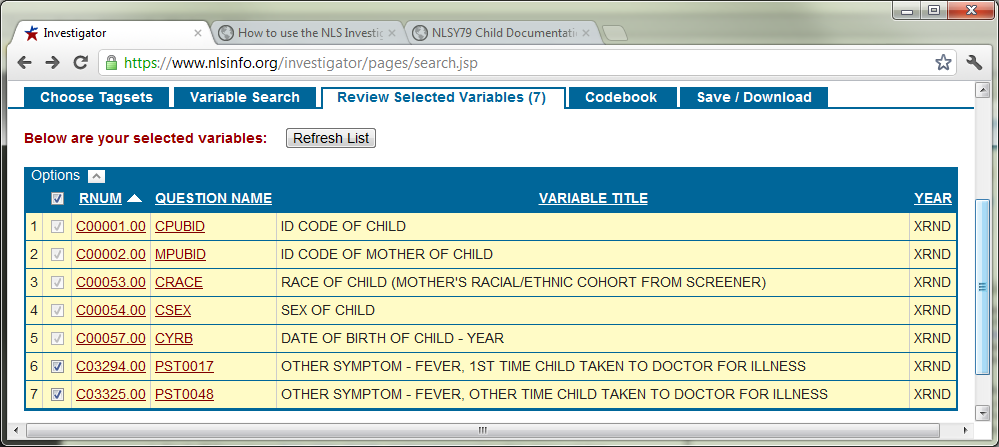
Review your selected variables by clicking the corresponding tab. Notice that several important variables are automatically included in every dataset. In real research these steps are iterated many times, as you repeated select, then review, then save, then re-select, then re-review, then... But we'll move on, because these seven variables are good enough for an example.
-
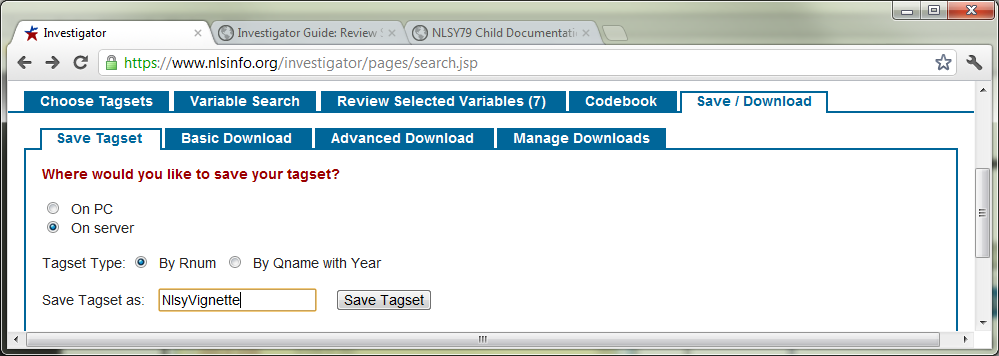
When the dataset is complete, it is time to save the tagset. A tagset file is simply metadata of the desired variables. The file identifies the variables, but does not contain actual data values. As your project evolves over time (because you're adding variables, or refreshing your dataset after a new survey is released), it's convenient to keep the metadata distinct from the real data.
The actual values are contained in the data file, which is discussed in the next two steps. These issues are covered further in the official tutorial.
-
The first step of the download process is to create the data file on the NLS server. Click the 'Save/Download' tab, and then the 'Advanced Download' tab. As far as the NlsyLinks package is concerned, only the the 'Comma-delimited datafile...' box needs to be checked. Then provide a 'Data filename'. Finally, click the 'Start Download' button.

-
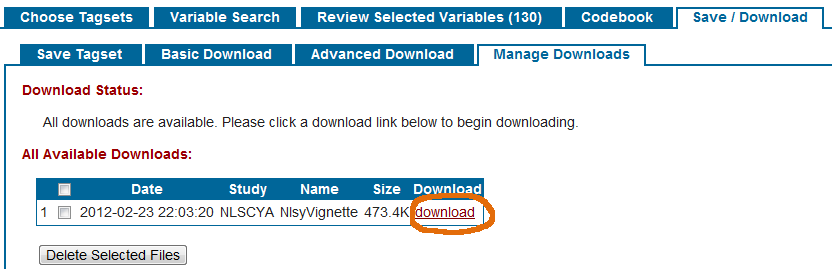
The second step of the download process is to transfer the zip file to your local computer. Click the maroon 'download' hyperlink.
-
Open the zip file and extract the *.csv file to a location that the vignette examples have permission to read. Then try some of the NlsyLinks vignette examples at https://cran.r-project.org/package=NlsyLinks.
Using Multiple Tagsets
Tagsets were introduced in Step 5, but are discussed more thoroughly here. Tagsets make large projects more manageable in two ways. First, they save effort and reduce errors because you don't have to re-select all the variables every time you revisit the NLS Investigator. You can save and load the tagsets during subsequent sessions. In fact, you can save multiple tagsets on the NLS server.
Second, using multiple tagsets provides a convenient approach to organize and compartmentalize your variables. It's not unusual for some complicated longitudinal studies to use hundreds of NLSY variables. We've found it easier to manage five tagsets of ~100 variables, than one tagset of 500. Since all NLSY tagsets (and therefore their datasets) automatically include the subject ID, merging the multiple datasets later is trivial with statistical software.
In R, use the merge function; the by argument should be R0000100 for NLSY79 subjects, C0000100 for NLSYC subjects, and R0000100 for NLSY97 subjects. For example, a study about intelligence and teenage fertility would have one tagset containing the intelligence variables, and a second tagset containing the fertility variables. These two tagsets eventually could produce two CSV data files called IQ.csv and Fertility.csv, located in the BGResearch directory. The R code to read and merge these two datasets could be as simple as
dsIQ        <- read.csv('C:/BGResearch/IQ.csv', header=TRUE)
dsFertility <- read.csv('C:/BGResearch/Fertility.csv', header=TRUE)
ds          <- merge(dsIQ, dsFertility, by="C0000100")
In SAS, the merge function (and its BY argument) behaves similarly as above. Notice that the SAS documentation states, "Before you can perform a match-merge, all data sets must be sorted by the variables that you want to use for the merge", which is C0000100 in this example.
If you're importing CSV files specifically for the NlsyLinks package, you'll find functions like ReadCsvNlsy79Gen1 and ReadCsvNlsy79Gen2 more convenient for later analyses.
Tagset History
We recommend saving the tagsets on both the NLS server and your local machine. Tagsets are not guaranteed to be retained on the NLS server more than 90 days. Locally save when variables are added or removed from the tagset in a consistent location, and name the file to reflect the current date. The files can be read with any simple text editor. The directory below contains the partial evolution of four distinct tagsets (i.e., 'Gen1Links', 'Gen2Links', 'Gen2ImplicitFather', 'Gen2LinksFromGen1').
Notes
This package's development has been supported by two grants from NIH. The first, NIH Grant 1R01HD65865, “NLSY Kinship Links: Reliable and Valid Sibling Identification” (PI: Joe Rodgers; Vignette Construction by Will Beasley) supported the (virtually) final completion of the NLSY79 and NLSYC/YA kinship linking files. The second, NIH Grant 1R01HD087395, “New NLSY Kinship Links and Longitudinal/ Cross-Generational Models: Cognition and Fertility Research," (PI: Joe Rodgers; Vignette Construction by Will Beasley) is supporting the development of the NLSY97 kinship links, and slight updates/extensions in the links for the two earlier data sources.
These screenshots were taken February and March 2012 with Google Chrome 17 and Windows 7 SP1 Enterprise. If you notice something that no longer corresponds to the current version to the NLS Investigator, please tell us.
nlsy-links/NlsyLinks documentation built on March 13, 2024, 4:05 a.m.
R Package Documentation
Browse R Packages
We want your feedback!
Note that we can't provide technical support on individual packages. You should contact the package authors for that.
This vignette will be useful to behavior genetic researchers interested in using the National Longitudinal Survey of Youth (NLSY79) or Children (NLSYC) data. To fit biometrical models to the NLSY or NLSYC requires that the data be extracted from the appropriate online NLSY database into a usable file format. The extracting software is called the NLS Investigator. We describe how to use the NLS Investigator to select and download variables. In subsequent vignettes, we show how to reformat the data into file structures that accommodate behavior genetic research, and how to fit biometrical models. The following steps are not specific to R, but rather precede the use of any analytic statistical software.
options(width = 80)
Terminology
This package considers both Nlsy79 Gen1 and Gen2 subjects. 'Gen1' refers to subjects in the original NLSY79 sample (https://www.nlsinfo.org/content/cohorts/nlsy79). 'Gen2' subjects are the biological offspring of the Gen1 females -i.e., those in the NLSY79 Children and Young Adults sample (https://www.nlsinfo.org/content/cohorts/nlsy79-children). The Nlsy97 is a third dataset that can be used for behavior genetic research (https://www.nlsinfo.org/content/cohorts/nlsy97), although this vignette focuses on the two generations in the NLSY79.
Standard terminology is to refer second generation subjects as 'children' when they are younger than age 15 (NSLYC), and as 'young adults' when they are 15 and older (NLSY79-YA); though they are the same respondents, different funding mechanisms and different survey items necessitate the distinction. This cohort is sometimes abbreviated as 'NLSY79-C', 'NLSY79C', 'NLSY-C' or 'NLSYC'. This packages uses 'Gen2' to refer to subjects of this generation, regardless of their age at the time of the survey.
Steps to Select Variables and Download Data
- Browse to [https://www.nlsinfo.org/investigator]. Select the 'REGISTER' link in the top right, and create a personal account. If you have already registered, Log In and proceed to the next step.
-
Select your desired cohort, in the dropdown box titled, "Select the study you want to work with:''. In the screenshot below, second generation of the NLSY79 sample is selected.
-
Select the variables. There are tens of thousands of variables in some cohorts, and selecting the correct ones can require careful attention and a few tricks. A thorough tutorial begins on the NLS Investigator page: [https://www.nlsinfo.org/content/access-data-investigator/investigator-user-guide]. To better leverage the NLSY's extensive variable set (and to avoid mistakes), we recommend that researchers dedicate time to this tutorial. However for the purposes of this vignette, we'll simply select a few easy variables.
First, in the 'Variables Search' tab, select 'Word in Title (enter search term)'. Second, type "other symptom - f" in the textbox. Third, clicking the 'Display Variables' button should retrieve at least four NLSYC variables whose title starts with "other symptom - f". Fourth, supposing we care about only their fevers, click their two corresponding checkboxes. (If you're curious, the 'XRND' value for year stands for cross round; XRND variables are calculated by the NLS staff, and typically come from the subject's most recent survey).
-
Review your selected variables by clicking the corresponding tab. Notice that several important variables are automatically included in every dataset. In real research these steps are iterated many times, as you repeated select, then review, then save, then re-select, then re-review, then... But we'll move on, because these seven variables are good enough for an example.
-
When the dataset is complete, it is time to save the tagset. A tagset file is simply metadata of the desired variables. The file identifies the variables, but does not contain actual data values. As your project evolves over time (because you're adding variables, or refreshing your dataset after a new survey is released), it's convenient to keep the metadata distinct from the real data.
The actual values are contained in the data file, which is discussed in the next two steps. These issues are covered further in the official tutorial.
-
The first step of the download process is to create the data file on the NLS server. Click the 'Save/Download' tab, and then the 'Advanced Download' tab. As far as the NlsyLinks package is concerned, only the the 'Comma-delimited datafile...' box needs to be checked. Then provide a 'Data filename'. Finally, click the 'Start Download' button.
-
The second step of the download process is to transfer the zip file to your local computer. Click the maroon 'download' hyperlink.
-
Open the zip file and extract the *.csv file to a location that the vignette examples have permission to read. Then try some of the NlsyLinks vignette examples at https://cran.r-project.org/package=NlsyLinks.
Using Multiple Tagsets
Tagsets were introduced in Step 5, but are discussed more thoroughly here. Tagsets make large projects more manageable in two ways. First, they save effort and reduce errors because you don't have to re-select all the variables every time you revisit the NLS Investigator. You can save and load the tagsets during subsequent sessions. In fact, you can save multiple tagsets on the NLS server.
Second, using multiple tagsets provides a convenient approach to organize and compartmentalize your variables. It's not unusual for some complicated longitudinal studies to use hundreds of NLSY variables. We've found it easier to manage five tagsets of ~100 variables, than one tagset of 500. Since all NLSY tagsets (and therefore their datasets) automatically include the subject ID, merging the multiple datasets later is trivial with statistical software.
In R, use the merge function; the by argument should be R0000100 for NLSY79 subjects, C0000100 for NLSYC subjects, and R0000100 for NLSY97 subjects. For example, a study about intelligence and teenage fertility would have one tagset containing the intelligence variables, and a second tagset containing the fertility variables. These two tagsets eventually could produce two CSV data files called IQ.csv and Fertility.csv, located in the BGResearch directory. The R code to read and merge these two datasets could be as simple as
dsIQ <- read.csv('C:/BGResearch/IQ.csv', header=TRUE) dsFertility <- read.csv('C:/BGResearch/Fertility.csv', header=TRUE) ds <- merge(dsIQ, dsFertility, by="C0000100")
In SAS, the merge function (and its BY argument) behaves similarly as above. Notice that the SAS documentation states, "Before you can perform a match-merge, all data sets must be sorted by the variables that you want to use for the merge", which is C0000100 in this example.
If you're importing CSV files specifically for the NlsyLinks package, you'll find functions like ReadCsvNlsy79Gen1 and ReadCsvNlsy79Gen2 more convenient for later analyses.
Tagset History
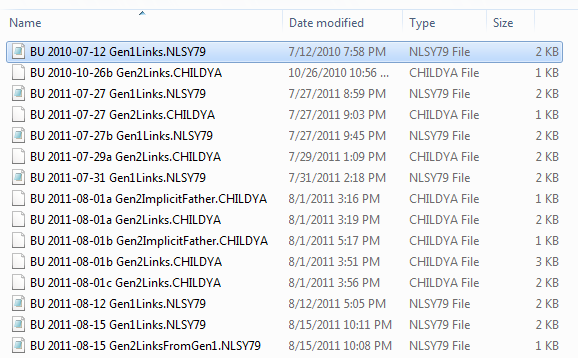
We recommend saving the tagsets on both the NLS server and your local machine. Tagsets are not guaranteed to be retained on the NLS server more than 90 days. Locally save when variables are added or removed from the tagset in a consistent location, and name the file to reflect the current date. The files can be read with any simple text editor. The directory below contains the partial evolution of four distinct tagsets (i.e., 'Gen1Links', 'Gen2Links', 'Gen2ImplicitFather', 'Gen2LinksFromGen1').
Notes
This package's development has been supported by two grants from NIH. The first, NIH Grant 1R01HD65865, “NLSY Kinship Links: Reliable and Valid Sibling Identification” (PI: Joe Rodgers; Vignette Construction by Will Beasley) supported the (virtually) final completion of the NLSY79 and NLSYC/YA kinship linking files. The second, NIH Grant 1R01HD087395, “New NLSY Kinship Links and Longitudinal/ Cross-Generational Models: Cognition and Fertility Research," (PI: Joe Rodgers; Vignette Construction by Will Beasley) is supporting the development of the NLSY97 kinship links, and slight updates/extensions in the links for the two earlier data sources.
These screenshots were taken February and March 2012 with Google Chrome 17 and Windows 7 SP1 Enterprise. If you notice something that no longer corresponds to the current version to the NLS Investigator, please tell us.
R Package Documentation
Browse R Packages
We want your feedback!
Note that we can't provide technical support on individual packages. You should contact the package authors for that.
Embedding an R snippet on your website
Add the following code to your website.
For more information on customizing the embed code, read Embedding Snippets.