README.md
In czxa/nivowaffle: waffle plot
nivowaffle
reactR 是一种新的建造html控件的工作流程。本文基于对 Build Your Own React-based htmlwidget 的学习,自己构建了一个绘制华夫图的html控件。
安装 reactR
devtools::install_github("react-R/reactR")
Build Your Own React-based htmlwidget 一文中介绍了如何构建日历图小部件的流程,可以先安装试用一下:nivocal

r
devtools::install_github('react-R/nivocal')
library(nivocal)

df <- data.frame(
  day = seq.Date(
    from = as.Date("2017-03-15"),
    length.out = 500,
    by = "days"
  ),
  value = round(runif(500)*1000, 0)
)

nivocal(df)
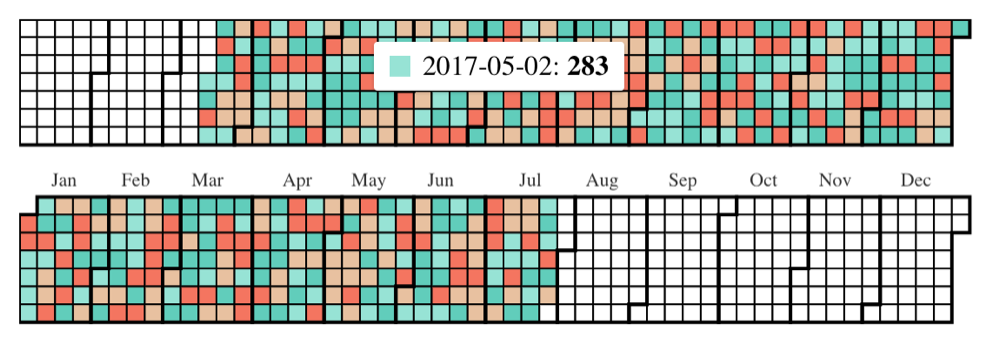
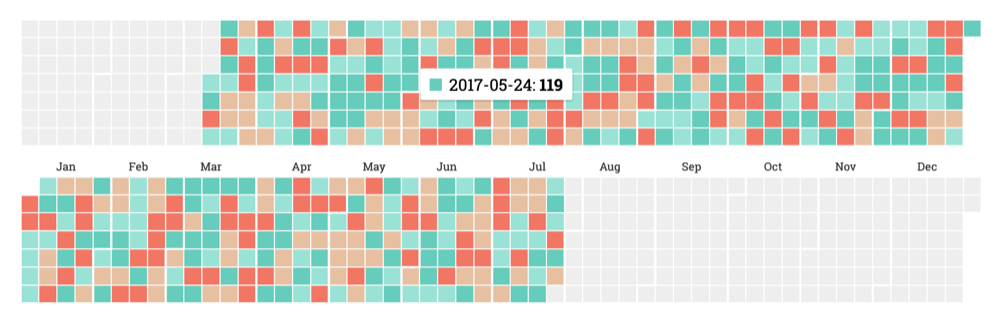
nivocal(
  df,
  emptyColor = "#eeeeee",
  colors = c(
    "#61cdbb",
    "#97e3d5",
    "#e8c1a0",
    "#f47560"),
  monthBorderColor = "#ffffff",
  dayBorderColor = "#ffffff"
)
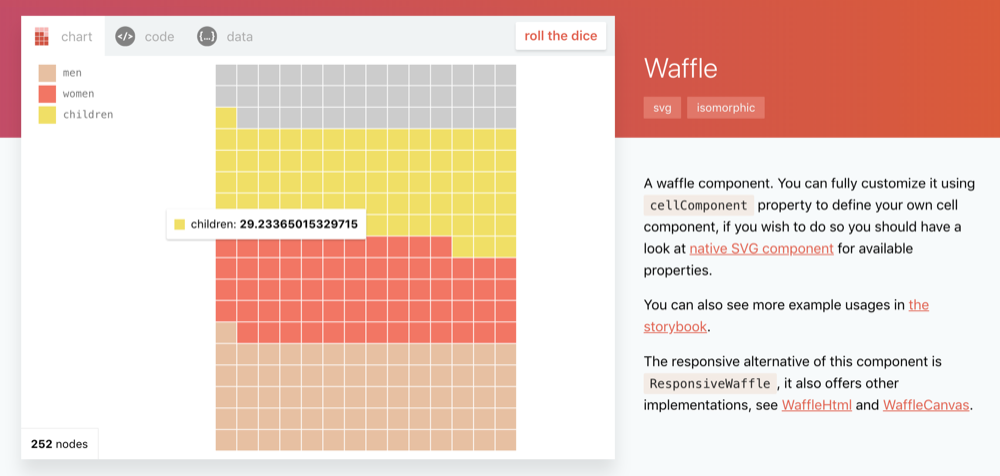
开始制作华夫图的控件
华夫图的示例在这里:waffle
创建 nivowaffle 包
usethis::create_package('nivowaffle')
创建名为 nivowaffle 的草稿
reactR::scaffoldReactWidget(
  'nivowaffle',
  npmPkgs = c("@nivo/waffle" = "0.52.1"))
你可以在这个网站上找到你想制作的控件的版本:https://unpkg.com/@nivo/waffle@0.52.1/。
完成下面的两步之后,你的包的结构应该是这样的:
$ tree
.
├── DESCRIPTION
├── NAMESPACE
├── R
│   └── nivowaffle.R
├── app.R
├── inst
│   └── htmlwidgets
│       └── nivowaffle.yaml
├── man
├── nivowaffle.Rproj
├── package.json
├── srcjs
│   └── nivowaffle.js
└── webpack.config.js

5 directories, 9 files
首先编辑 nivowaffle.js:
import { reactWidget } from 'reactR';
import { ResponsiveWaffle } from '@nivo/waffle';

reactWidget(
  'nivowaffle',
  'output',
  {ResponsiveWaffle: ResponsiveWaffle},
  {}
);
然后我们需要使用yarn进行打包,在终端运行(可以直接在 RStudio中开启):
# 如果你没有安装yarn,你可以使用brew进行安装:
brew install yarn
# 然后运行,注意是先要把目录切换到包目录里面
cd nivowaffle
yarn install
在进行下一步之前,你需要先把 webpack.config.js 文件打开根据你的需要输入下面的内容:
var path = require('path');

module.exports = {
    entry: path.join(__dirname, 'srcjs', 'nivowaffle.js'),
    output: {
        path: path.join(__dirname, 'inst', 'htmlwidgets'),
        filename: 'nivowaffle.js'
    },
    module: {
        rules: [
            {
                test: /\.js$/,
                loader: 'babel-loader',
                options: {
                    presets: ['@babel/preset-env', '@babel/preset-react']
                }
            }
        ]
    },
    externals: {
        'react': 'window.React',
        'react-dom': 'window.ReactDOM',
        'reactR': 'window.reactR'
    },
    stats: {
        colors: true
    },
    devtool: 'source-map'
};
显然,这样设置的目的是将 nivowaffle.js 编译后移动到 /inst/htmlwidgets文件夹里。
完成这一步之后再回到终端:
yarn run webpack
打包完成!!!
R函数绑定
R函数绑定的目的是将R的数据传递给JS,我们注意到JS接收的数据应该是这样的:
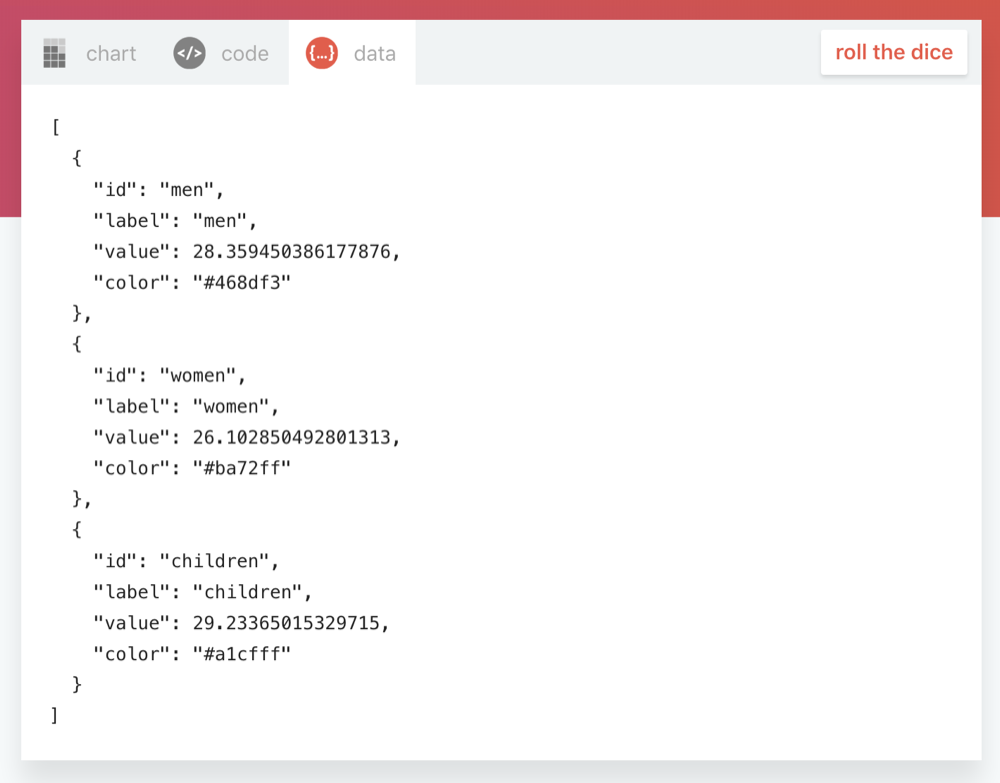
我们可以按照下面的方式修改 nivowaffle.R 中的 nivowaffle() 函数:
#' 绘制华夫图
#'
#' @import htmlwidgets
#'
#' @export
nivowaffle <- function(
  data = NULL,
  total = 100,
  rows = 18,
  columns = 14,
  colorBy = "id",
  width = NULL,
  height = NULL,
  elementId = NULL) {

  data <- mapply(
    function(id, label, value, color){
      list(
        id = id,
        label = label,
        value = value,
        color = color
      )
    },
    data$id,
    data$label,
    data$value,
    data$color,
    SIMPLIFY = FALSE
  )

  component <- reactR::reactMarkup(htmltools::tag(
    "ResponsiveWaffle",
    list(
      data = data,
      total = total,
      rows = rows,
      columns = columns,
      colorBy = colorBy
    )
  )
)
编译和安装
下面再编译和安装包:
devtools::document()
devtools::install(quick = TRUE)
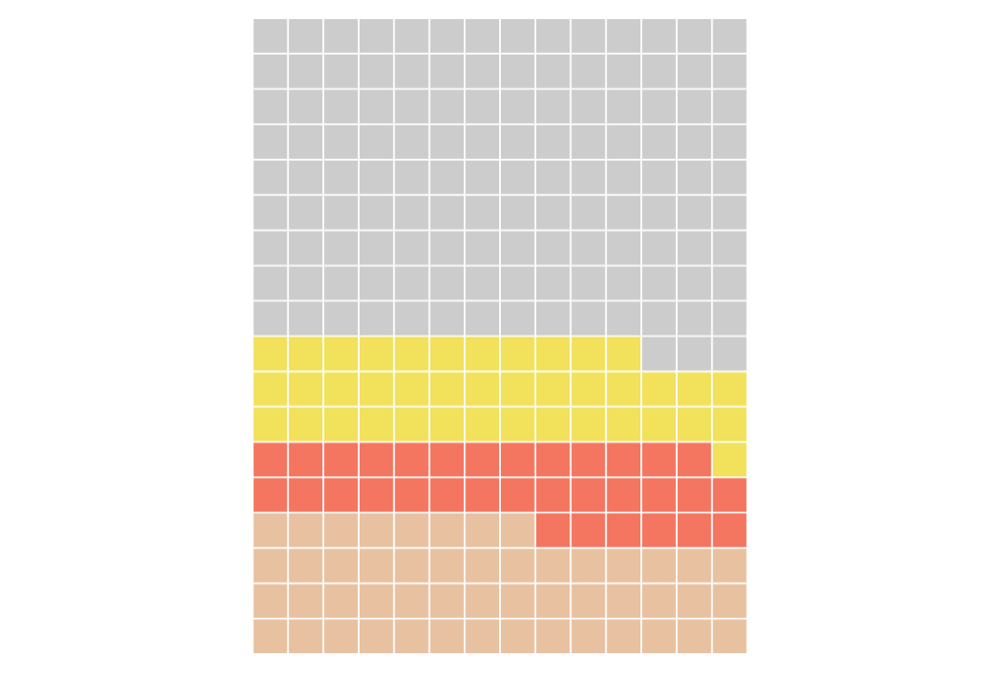
测试
library(nivowaffle)
df <- data.frame(
   id = c("men", "women", "children"),
   label = c("men", "women", "children"),
   value = c(20, 13, 16),
   color = c("#468df3", "#ba72ff", "#a1cfff")
)
nivowaffle(df)
为了更自由地添加自定义化,我们可以按照下面的方式修改 nivowaffle.R 中的 nivowaffle() 函数:
#' 绘制华夫图
#'
#' @import htmlwidgets
#'
#' @export
nivowaffle <- function(
  data = NULL,
  total = 100,
  rows = 18,
  columns = 14,
  colorBy = "id",
  ...,
  width = NULL,
  height = NULL,
  elementId = NULL) {

  data <- mapply(
    function(id, label, value, color){
      list(
        id = id,
        label = label,
        value = value,
        color = color
      )
    },
    data$id,
    data$label,
    data$value,
    data$color,
    SIMPLIFY = FALSE
  )

  component <- reactR::reactMarkup(htmltools::tag(
    "ResponsiveWaffle",
    list(
      data = data,
      total = total,
      rows = rows,
      columns = columns,
      colorBy = colorBy,
      ...
    )
  )
)
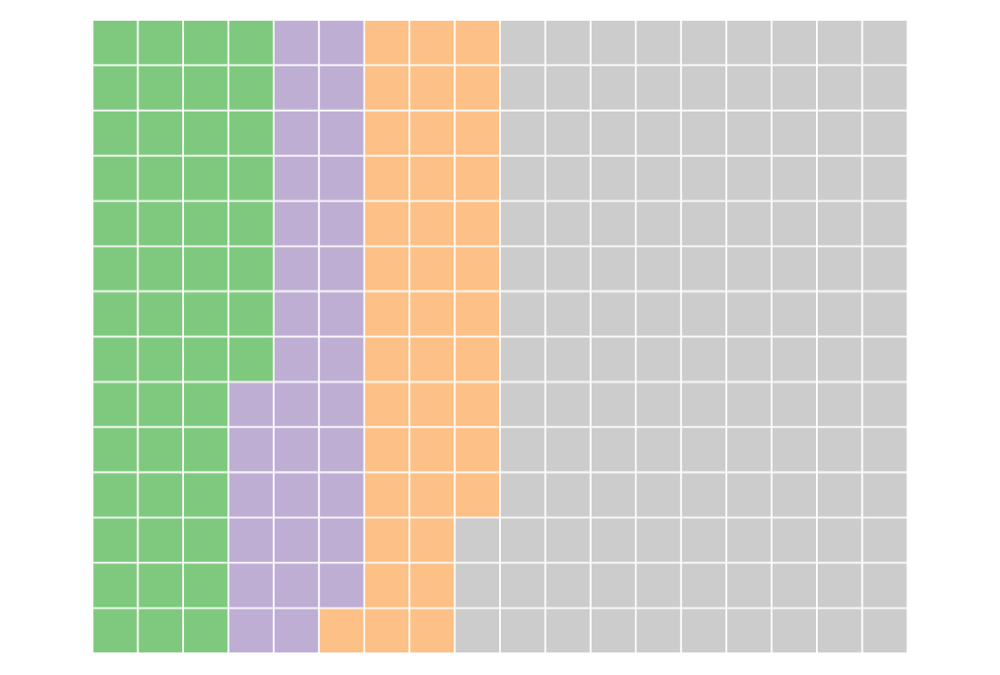
也就是说,我加了两个省略号。重新安装之后再运行:
nivowaffle(df,
           total = 100,
           rows = 14,
           columns = 18,
           colors="accent",
           borderColor="inherit:darker(0.3)",
           fillDirection = "left")
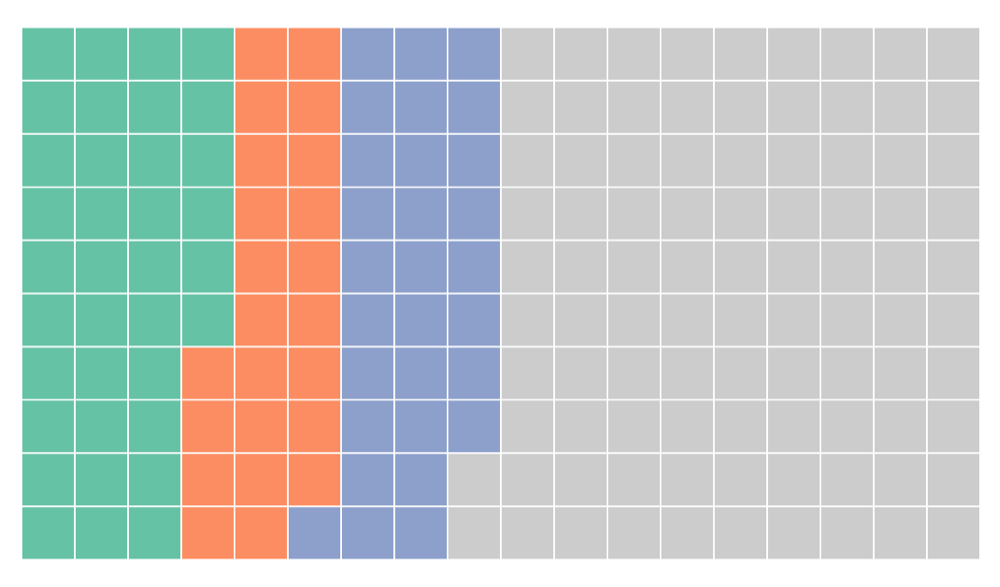
其中 colors 参数可以使用 http://colorbrewer2.org 的调色板名称,再例如:
nivowaffle(df,
           total = 100,
           rows = 10,
           columns = 18,
           colors="set2",
           borderColor="inherit:darker(0.3)",
           fillDirection = "left")
运行示例 shiny APP
你需要把包文件夹里面的 app.R 中的server里面的函数改一下,例如上面那个。
library(shiny)
library(nivowaffle)

ui <- fluidPage(
  titlePanel("reactR HTMLWidget Example"),
  nivowaffleOutput('widgetOutput')
)

server <- function(input, output, session){
  df <- data.frame(
   id = c("men", "women", "children"),
   label = c("men", "women", "children"),
   value = c(20, 13, 16),
   color = c("#468df3", "#ba72ff", "#a1cfff")
  )
  output$widgetOutput <- renderNivowaffle({
      nivowaffle(df,
             total = 100,
             rows = 10,
             columns = 18,
             colors="set2",
             borderColor="inherit:darker(0.3)",
             fillDirection = "left")
    })
}

shinyApp(ui, server)

czxa/nivowaffle documentation built on Nov. 5, 2019, 10:13 p.m.
R Package Documentation
Browse R Packages
We want your feedback!
Note that we can't provide technical support on individual packages. You should contact the package authors for that.
nivowaffle
reactR 是一种新的建造html控件的工作流程。本文基于对 Build Your Own React-based htmlwidget 的学习,自己构建了一个绘制华夫图的html控件。
安装 reactR
devtools::install_github("react-R/reactR")
Build Your Own React-based htmlwidget 一文中介绍了如何构建日历图小部件的流程,可以先安装试用一下:nivocal
r
devtools::install_github('react-R/nivocal')
library(nivocal)
df <- data.frame(
day = seq.Date(
from = as.Date("2017-03-15"),
length.out = 500,
by = "days"
),
value = round(runif(500)*1000, 0)
)
nivocal(df)
nivocal(
df,
emptyColor = "#eeeeee",
colors = c(
"#61cdbb",
"#97e3d5",
"#e8c1a0",
"#f47560"),
monthBorderColor = "#ffffff",
dayBorderColor = "#ffffff"
)
开始制作华夫图的控件
华夫图的示例在这里:waffle
创建 nivowaffle 包
usethis::create_package('nivowaffle')
创建名为 nivowaffle 的草稿
reactR::scaffoldReactWidget(
'nivowaffle',
npmPkgs = c("@nivo/waffle" = "0.52.1"))
你可以在这个网站上找到你想制作的控件的版本:https://unpkg.com/@nivo/waffle@0.52.1/。
完成下面的两步之后,你的包的结构应该是这样的:
$ tree
.
├── DESCRIPTION
├── NAMESPACE
├── R
│ └── nivowaffle.R
├── app.R
├── inst
│ └── htmlwidgets
│ └── nivowaffle.yaml
├── man
├── nivowaffle.Rproj
├── package.json
├── srcjs
│ └── nivowaffle.js
└── webpack.config.js
5 directories, 9 files
首先编辑 nivowaffle.js:
import { reactWidget } from 'reactR';
import { ResponsiveWaffle } from '@nivo/waffle';
reactWidget(
'nivowaffle',
'output',
{ResponsiveWaffle: ResponsiveWaffle},
{}
);
然后我们需要使用yarn进行打包,在终端运行(可以直接在 RStudio中开启):
# 如果你没有安装yarn,你可以使用brew进行安装:
brew install yarn
# 然后运行,注意是先要把目录切换到包目录里面
cd nivowaffle
yarn install
在进行下一步之前,你需要先把 webpack.config.js 文件打开根据你的需要输入下面的内容:
var path = require('path');
module.exports = {
entry: path.join(__dirname, 'srcjs', 'nivowaffle.js'),
output: {
path: path.join(__dirname, 'inst', 'htmlwidgets'),
filename: 'nivowaffle.js'
},
module: {
rules: [
{
test: /\.js$/,
loader: 'babel-loader',
options: {
presets: ['@babel/preset-env', '@babel/preset-react']
}
}
]
},
externals: {
'react': 'window.React',
'react-dom': 'window.ReactDOM',
'reactR': 'window.reactR'
},
stats: {
colors: true
},
devtool: 'source-map'
};
显然,这样设置的目的是将 nivowaffle.js 编译后移动到 /inst/htmlwidgets文件夹里。
完成这一步之后再回到终端:
yarn run webpack
打包完成!!!
R函数绑定
R函数绑定的目的是将R的数据传递给JS,我们注意到JS接收的数据应该是这样的:
我们可以按照下面的方式修改 nivowaffle.R 中的 nivowaffle() 函数:
#' 绘制华夫图
#'
#' @import htmlwidgets
#'
#' @export
nivowaffle <- function(
data = NULL,
total = 100,
rows = 18,
columns = 14,
colorBy = "id",
width = NULL,
height = NULL,
elementId = NULL) {
data <- mapply(
function(id, label, value, color){
list(
id = id,
label = label,
value = value,
color = color
)
},
data$id,
data$label,
data$value,
data$color,
SIMPLIFY = FALSE
)
component <- reactR::reactMarkup(htmltools::tag(
"ResponsiveWaffle",
list(
data = data,
total = total,
rows = rows,
columns = columns,
colorBy = colorBy
)
)
)
编译和安装
下面再编译和安装包:
devtools::document()
devtools::install(quick = TRUE)
测试
library(nivowaffle)
df <- data.frame(
id = c("men", "women", "children"),
label = c("men", "women", "children"),
value = c(20, 13, 16),
color = c("#468df3", "#ba72ff", "#a1cfff")
)
nivowaffle(df)
为了更自由地添加自定义化,我们可以按照下面的方式修改 nivowaffle.R 中的 nivowaffle() 函数:
#' 绘制华夫图
#'
#' @import htmlwidgets
#'
#' @export
nivowaffle <- function(
data = NULL,
total = 100,
rows = 18,
columns = 14,
colorBy = "id",
...,
width = NULL,
height = NULL,
elementId = NULL) {
data <- mapply(
function(id, label, value, color){
list(
id = id,
label = label,
value = value,
color = color
)
},
data$id,
data$label,
data$value,
data$color,
SIMPLIFY = FALSE
)
component <- reactR::reactMarkup(htmltools::tag(
"ResponsiveWaffle",
list(
data = data,
total = total,
rows = rows,
columns = columns,
colorBy = colorBy,
...
)
)
)
也就是说,我加了两个省略号。重新安装之后再运行:
nivowaffle(df,
total = 100,
rows = 14,
columns = 18,
colors="accent",
borderColor="inherit:darker(0.3)",
fillDirection = "left")
其中 colors 参数可以使用 http://colorbrewer2.org 的调色板名称,再例如:
nivowaffle(df,
total = 100,
rows = 10,
columns = 18,
colors="set2",
borderColor="inherit:darker(0.3)",
fillDirection = "left")
运行示例 shiny APP
你需要把包文件夹里面的 app.R 中的server里面的函数改一下,例如上面那个。
library(shiny)
library(nivowaffle)
ui <- fluidPage(
titlePanel("reactR HTMLWidget Example"),
nivowaffleOutput('widgetOutput')
)
server <- function(input, output, session){
df <- data.frame(
id = c("men", "women", "children"),
label = c("men", "women", "children"),
value = c(20, 13, 16),
color = c("#468df3", "#ba72ff", "#a1cfff")
)
output$widgetOutput <- renderNivowaffle({
nivowaffle(df,
total = 100,
rows = 10,
columns = 18,
colors="set2",
borderColor="inherit:darker(0.3)",
fillDirection = "left")
})
}
shinyApp(ui, server)
R Package Documentation
Browse R Packages
We want your feedback!
Note that we can't provide technical support on individual packages. You should contact the package authors for that.
Embedding an R snippet on your website
Add the following code to your website.
For more information on customizing the embed code, read Embedding Snippets.