Nothing
(R)QGIS installation guide for Windows, Mac & Linux
In RQGIS: Integrating R with QGIS
knitr::opts_chunk$set(
  #fig.path = "https://raw.githubusercontent.com/jannes-m/RQGIS/master/figures/",
  fig.align = "center",
  collapse = TRUE,
  comment = "#>"
)
Vignette info
This vignette guides you through the installation process of QGIS, GRASS- and SAGA-GIS on three different platforms (Windows, Mac, Linux).
Please use the long-term release QGIS 2.18.
So far, RQGIS does not work with QGIS 3.
Following our instructions should ensure that RQGIS will work properly.
With the exception of SAGA, we recommend to use the latest stable version of all software packages.
Though other versions might also work with RQGIS, we did not test this.
Overall, RQGIS allows access to more than 1000 geoalgorithms.
However, please note that the number of geoalgorithms you can use from within RQGIS depends on the platform, the system architecture, the selection of installed third-party providers and software package versions.
Windows
There are at least two options to install QGIS on Windows in such a way that RQGIS can access QGIS. The first option is the Standalone Installer from the QGIS installer page.
This will install QGIS along with the third-party providers GRASS and SAGA.
However, if you would like to use even more third-party providers (e.g., GDAL, GEOS, Taudem, OTB, PostGIS, etc.), we recommend to use the OSGeo4W Network installer.
This installer is available on the QGIS installer page as well as on the OSGeo4W-website.
To install OSGeo4W, the easiest way is to to use the Express installation:
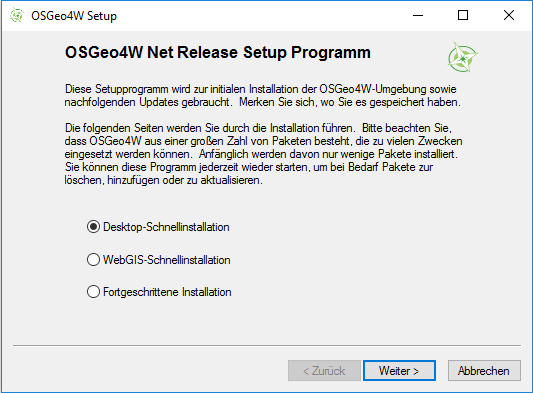
We are sorry, that our installer uses a German dialog.
Apparently, OSGeo4w automatically uses the language in accordance with the system locale. Nevertheless, it should be easy enough to follow our steps.
- Select "Express Installation"
- Next check "QGIS, GRASS and GDAL"
- Start the installation.
This installation is more or less equivalent to the standalone QGIS-installation.
However, to have the full choice of available geoalgorithms provided by QGIS, we recommend to use the advanced settings of the OSGeo4W Network installer:
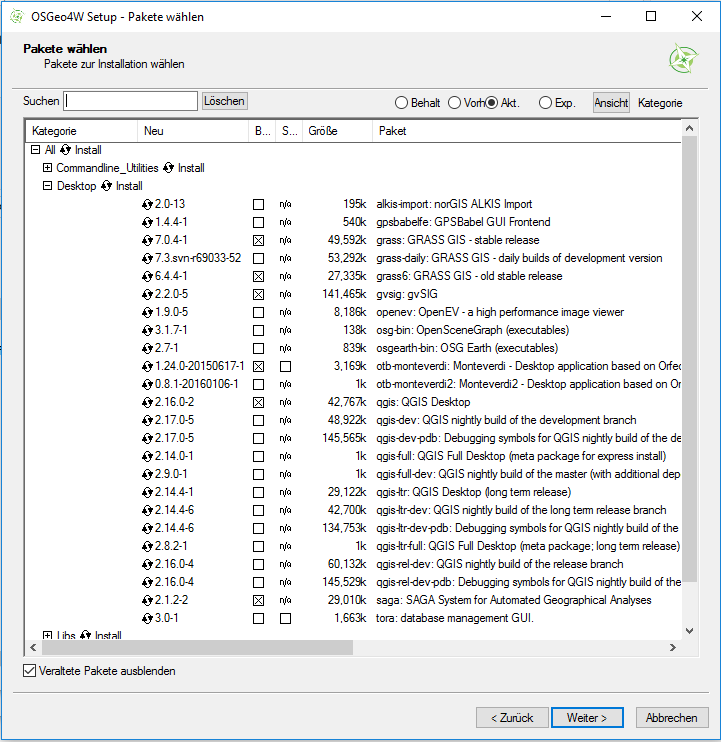
- Run the OSGeo4W setup and choose the advanced installation.
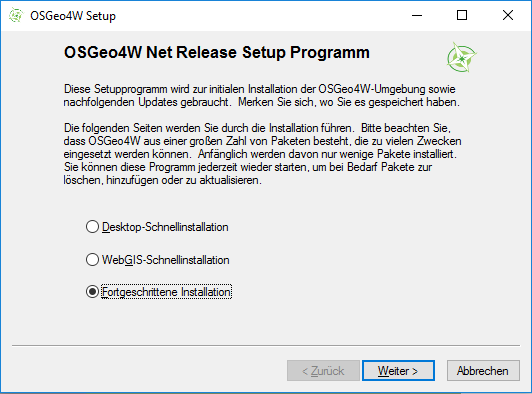
- Subsequently, accept the default settings until you reach the “Select Packages” window.
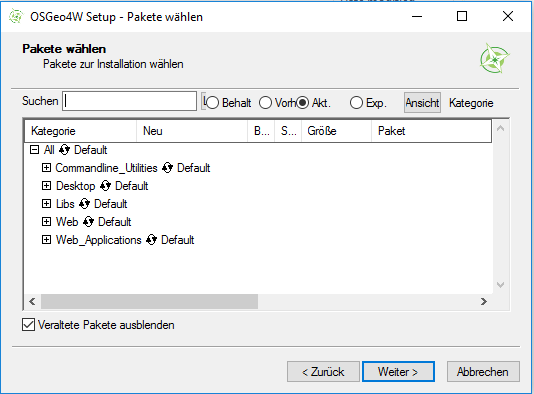
- After expanding the command line utilities, we choose several commandline tools such as gdal and python-core (of course, you can select other components as well):
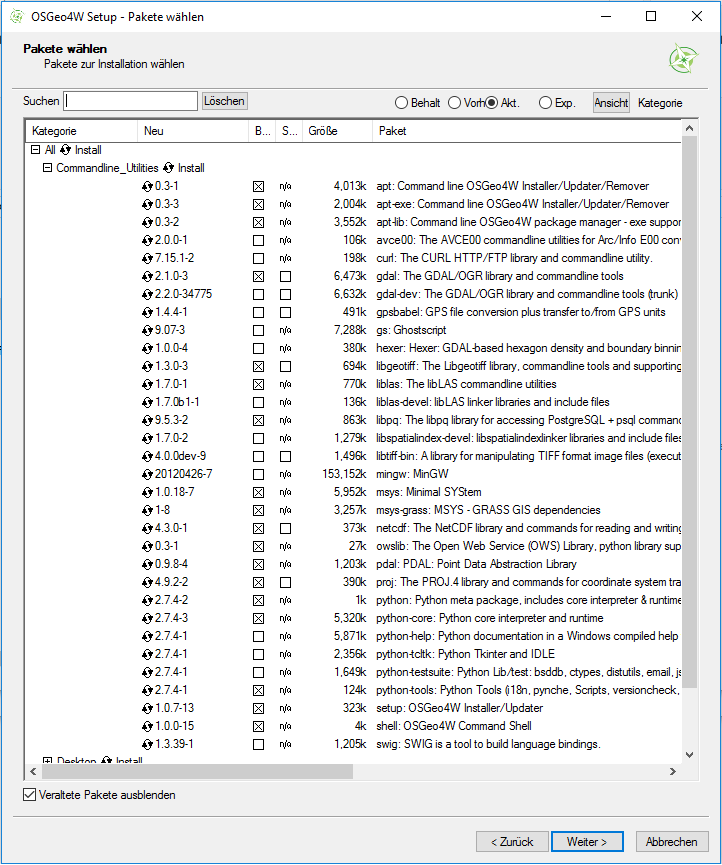
Additionally, we choose the Desktop-GIS GRASS 6 & 7, the Orfeo Toolbox, SAGA, and of course QGIS. Here, we install both the most recent QGIS version as well as the long-term release.
RQGIS will use the latter by default since this is the most stable version and everything is already set up correctly.
<!--
By contrast, using QGIS 2.16.1 would require some additional code adjustment (see above).
 -->
4. We leave the rest as is, click "Next" and wait for the OSGeo4W-suggestions which we accept.
-->
4. We leave the rest as is, click "Next" and wait for the OSGeo4W-suggestions which we accept.
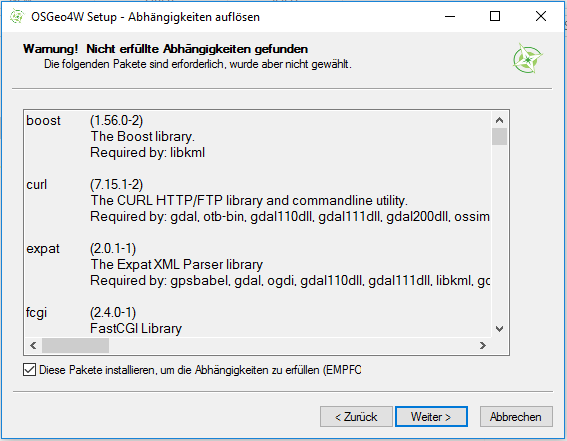
Clicking "Next" once more will start the download and installation process which might take a while.
If you wish to to modify, uninstall or update some of the installed components, you might do so later on by running ../OSGeo4W/bin/osgeo4w-setup.exe.
Alternatively, you can download and run again the latest OSGeo4W-executable.
If you additionally want to use the LiDAR processing tools (LAStools), please follow the steps found here.
Linux
Ubuntu
QGIS (and GRASS)
If you install QGIS with the built-in software managers, you will most likely get an outdated QGIS version.
To install more recent QGIS releases, we recommend to follow the installation instructions from the QGIS installers website.
Here, we just describe exemplarily the QGIS installation procedure under Debian/Ubuntu following the description found here.
RQGIS should work as well with Linux derivatives other than Ubuntu. However, we did not test this.
Open a terminal window. First of all, make sure to remove QGIS and GRASS packages you may have installed before from other repositories:
sudo apt-get --purge remove qgis
sudo apt autoremove --purge-remove
sudo apt autoremove
sudo apt-get update
Next add the correct repository to /etc/apt/sources.list.
Here, we use the current long-term release (2.18):
QGIS 2.18.x for Ubuntu 18.04
The "ubuntugis" repo does not have support for bionic.
So we need to use the "debian" repos.
# add QGIS repository for Ubuntu 18.04 to sources.list
sudo sh -c 'echo "deb http://qgis.org/debian-ltr bionic main" >> /etc/apt/sources.list'
sudo sh -c 'echo "deb-src http://qgis.org/debian-ltr bionic main" >> /etc/apt/sources.list'
QGIS 2.18.x for Ubuntu 16.04
Since xenial lacks a native gdal2 installation, we will use the "ubuntugis" repos including its "ubuntugis-unstable" repo (for gdal2) to install QGIS.
# add QGIS repository for Ubuntu 16.04 to sources.list
sudo sh -c 'echo "deb http://qgis.org/ubuntugis-ltr xenial main" >> /etc/apt/sources.list'
sudo sh -c 'echo "deb-src http://qgis.org/ubuntugis-ltr xenial main" >> /etc/apt/sources.list'
sudo sh -c 'echo "deb http://ppa.launchpad.net/ubuntugis/ubuntugis-unstable/ubuntu xenial main" >> /etc/apt/sources.list'
sudo add-apt-repository ppa:ubuntugis/ubuntugis-unstable
For other Ubuntu releases, simply replace 'xenial' with the respective release name.
Now we need to add the GPG key so that we do not face key errors:
wget -O - http://qgis.org/downloads/qgis-2017.gpg.key | gpg --import
# to verify, run:
# gpg --fingerprint CAEB3DC3BDF7FB45
gpg --export --armor CAEB3DC3BDF7FB45 | sudo apt-key add -
After that, we can install QGIS and GRASS as follows:
sudo apt-get update
sudo apt-get install qgis python-qgis qgis-plugin-grass
SAGA
You can install the SAGA LTS 2.3.1 version from the ubuntugis/unstable repository.
If you haven't done so yet, add the repository and then simply install SAGA via apt-get:
sudo add-apt-repository ppa:ubuntugis/ubuntugis-unstable
sudo apt-get update
sudo apt-get install saga
If you would like to use another SAGA version, you need to compile it yourself (see here).
Please note, however, that QGIS currently only supports the SAGA LTR 2.3.x as far as we know.
Arch Linux
You can install various QGIS, SAGA and GRASS versions from the Arch User Repository.
We recommend to use the yaourt package manager.
Mac OS X
SAGA
There is no binary install of SAGA for macOS.
We recommend to use the bottle installation from homebrew:
# brew tap osgeo4mac
brew install saga-gis-lts
brew link saga-gis-lts --force
If you do not link SAGA with force, QGIS will not be able to detect SAGA.
Alternatively, you can compile SAGA from source from the SAGA website.
However, this is tedious and QGIS2 only supports the SAGA LTS version.
GRASS
You can install GRASS6 and GRASS7 via homebrew:
# brew tap osgeo4mac
brew install grass6 grass7
The binary GRASS installation can be found here.
However, we recommend to use the homebrew approach.
When installing GRASS7 independently of QGIS via homebrew, please make sure to install it before you have installed QGIS.
Only this way, the path for the QGIS processing plugin will be updated.
Otherwise, the GRASS installation will work, however, GRASS7Utils.grassPath(), a QGIS function that links to the GRASS installation, gives back a non-existing path such as /Applications/Grass-7.0.app/Contents/MacOS which in turn prevents GRASS algorithms from working from within QGIS.
QGIS
Two options exist installing QGIS on macOS
- Using
homebrew (recommended)
# brew tap osgeo4mac
brew install qgis2
Check brew info qgis2 for more available options.
However, if you use them, QGIS will be compiled from source which may take > 30 min (depending on your system).
Otherwise, pre-built bottles (= binaries) will be used which speeds up the installation process a lot.
Note: Make sure to install SAGA and GRASS before QGIS so that QGIS finds the correct paths.
- Install QGIS binary from Kyngchaos
Homebrew also supports GUI installations.
QGIS can be installed using
brew cask install qgis
from the command line if homebrew is installed and configured correctly.
If you do not (want to) use homebrew, you can install the QGIS binary from https://www.qgis.org/en/site/forusers/download.html.
This is exactly the same as calling brew cask install qgis.
If you choose this option, you will get the following error messages during QGIS processing
QSqlDatabase: QSQLITE driver not loaded
QSqlDatabase: available drivers:
QSqlQuery::prepare: database not open
[1] "ERROR: Opening of authentication db FAILED"
[2] "WARNING: Auth db query exec() FAILED"
These messages DO NOT affect RQGIS usage.
Try the RQGIS package in your browser
Any scripts or data that you put into this service are public.
RQGIS documentation built on May 2, 2019, 8:23 a.m.
R Package Documentation
Browse R Packages
We want your feedback!
Note that we can't provide technical support on individual packages. You should contact the package authors for that.
knitr::opts_chunk$set( #fig.path = "https://raw.githubusercontent.com/jannes-m/RQGIS/master/figures/", fig.align = "center", collapse = TRUE, comment = "#>" )
Vignette info
This vignette guides you through the installation process of QGIS, GRASS- and SAGA-GIS on three different platforms (Windows, Mac, Linux). Please use the long-term release QGIS 2.18. So far, RQGIS does not work with QGIS 3. Following our instructions should ensure that RQGIS will work properly. With the exception of SAGA, we recommend to use the latest stable version of all software packages. Though other versions might also work with RQGIS, we did not test this.
Overall, RQGIS allows access to more than 1000 geoalgorithms. However, please note that the number of geoalgorithms you can use from within RQGIS depends on the platform, the system architecture, the selection of installed third-party providers and software package versions.
Windows
There are at least two options to install QGIS on Windows in such a way that RQGIS can access QGIS. The first option is the Standalone Installer from the QGIS installer page. This will install QGIS along with the third-party providers GRASS and SAGA. However, if you would like to use even more third-party providers (e.g., GDAL, GEOS, Taudem, OTB, PostGIS, etc.), we recommend to use the OSGeo4W Network installer. This installer is available on the QGIS installer page as well as on the OSGeo4W-website.
To install OSGeo4W, the easiest way is to to use the Express installation:
We are sorry, that our installer uses a German dialog. Apparently, OSGeo4w automatically uses the language in accordance with the system locale. Nevertheless, it should be easy enough to follow our steps.
- Select "Express Installation"
- Next check "QGIS, GRASS and GDAL"
- Start the installation.
This installation is more or less equivalent to the standalone QGIS-installation. However, to have the full choice of available geoalgorithms provided by QGIS, we recommend to use the advanced settings of the OSGeo4W Network installer:
- Run the OSGeo4W setup and choose the advanced installation.
- Subsequently, accept the default settings until you reach the “Select Packages” window.
- After expanding the command line utilities, we choose several commandline tools such as gdal and python-core (of course, you can select other components as well):
Additionally, we choose the Desktop-GIS GRASS 6 & 7, the Orfeo Toolbox, SAGA, and of course QGIS. Here, we install both the most recent QGIS version as well as the long-term release. RQGIS will use the latter by default since this is the most stable version and everything is already set up correctly. <!-- By contrast, using QGIS 2.16.1 would require some additional code adjustment (see above).
-->
4. We leave the rest as is, click "Next" and wait for the OSGeo4W-suggestions which we accept.
Clicking "Next" once more will start the download and installation process which might take a while.
If you wish to to modify, uninstall or update some of the installed components, you might do so later on by running ../OSGeo4W/bin/osgeo4w-setup.exe.
Alternatively, you can download and run again the latest OSGeo4W-executable.
If you additionally want to use the LiDAR processing tools (LAStools), please follow the steps found here.
Linux
Ubuntu
QGIS (and GRASS)
If you install QGIS with the built-in software managers, you will most likely get an outdated QGIS version. To install more recent QGIS releases, we recommend to follow the installation instructions from the QGIS installers website.
Here, we just describe exemplarily the QGIS installation procedure under Debian/Ubuntu following the description found here. RQGIS should work as well with Linux derivatives other than Ubuntu. However, we did not test this.
Open a terminal window. First of all, make sure to remove QGIS and GRASS packages you may have installed before from other repositories:
sudo apt-get --purge remove qgis sudo apt autoremove --purge-remove sudo apt autoremove sudo apt-get update
Next add the correct repository to /etc/apt/sources.list.
Here, we use the current long-term release (2.18):
QGIS 2.18.x for Ubuntu 18.04
The "ubuntugis" repo does not have support for bionic.
So we need to use the "debian" repos.
# add QGIS repository for Ubuntu 18.04 to sources.list sudo sh -c 'echo "deb http://qgis.org/debian-ltr bionic main" >> /etc/apt/sources.list' sudo sh -c 'echo "deb-src http://qgis.org/debian-ltr bionic main" >> /etc/apt/sources.list'
QGIS 2.18.x for Ubuntu 16.04
Since xenial lacks a native gdal2 installation, we will use the "ubuntugis" repos including its "ubuntugis-unstable" repo (for gdal2) to install QGIS.
# add QGIS repository for Ubuntu 16.04 to sources.list sudo sh -c 'echo "deb http://qgis.org/ubuntugis-ltr xenial main" >> /etc/apt/sources.list' sudo sh -c 'echo "deb-src http://qgis.org/ubuntugis-ltr xenial main" >> /etc/apt/sources.list' sudo sh -c 'echo "deb http://ppa.launchpad.net/ubuntugis/ubuntugis-unstable/ubuntu xenial main" >> /etc/apt/sources.list' sudo add-apt-repository ppa:ubuntugis/ubuntugis-unstable
For other Ubuntu releases, simply replace 'xenial' with the respective release name.
Now we need to add the GPG key so that we do not face key errors:
wget -O - http://qgis.org/downloads/qgis-2017.gpg.key | gpg --import # to verify, run: # gpg --fingerprint CAEB3DC3BDF7FB45 gpg --export --armor CAEB3DC3BDF7FB45 | sudo apt-key add -
After that, we can install QGIS and GRASS as follows:
sudo apt-get update sudo apt-get install qgis python-qgis qgis-plugin-grass
SAGA
You can install the SAGA LTS 2.3.1 version from the ubuntugis/unstable repository.
If you haven't done so yet, add the repository and then simply install SAGA via apt-get:
sudo add-apt-repository ppa:ubuntugis/ubuntugis-unstable sudo apt-get update sudo apt-get install saga
If you would like to use another SAGA version, you need to compile it yourself (see here). Please note, however, that QGIS currently only supports the SAGA LTR 2.3.x as far as we know.
Arch Linux
You can install various QGIS, SAGA and GRASS versions from the Arch User Repository. We recommend to use the yaourt package manager.
Mac OS X
SAGA
There is no binary install of SAGA for macOS.
We recommend to use the bottle installation from homebrew:
# brew tap osgeo4mac
brew install saga-gis-lts
brew link saga-gis-lts --force
If you do not link SAGA with force, QGIS will not be able to detect SAGA.
Alternatively, you can compile SAGA from source from the SAGA website. However, this is tedious and QGIS2 only supports the SAGA LTS version.
GRASS
You can install GRASS6 and GRASS7 via homebrew:
# brew tap osgeo4mac
brew install grass6 grass7
The binary GRASS installation can be found here.
However, we recommend to use the homebrew approach.
When installing GRASS7 independently of QGIS via homebrew, please make sure to install it before you have installed QGIS.
Only this way, the path for the QGIS processing plugin will be updated.
Otherwise, the GRASS installation will work, however, GRASS7Utils.grassPath(), a QGIS function that links to the GRASS installation, gives back a non-existing path such as /Applications/Grass-7.0.app/Contents/MacOS which in turn prevents GRASS algorithms from working from within QGIS.
QGIS
Two options exist installing QGIS on macOS
- Using
homebrew(recommended)
# brew tap osgeo4mac brew install qgis2
Check brew info qgis2 for more available options.
However, if you use them, QGIS will be compiled from source which may take > 30 min (depending on your system).
Otherwise, pre-built bottles (= binaries) will be used which speeds up the installation process a lot.
Note: Make sure to install SAGA and GRASS before QGIS so that QGIS finds the correct paths.
- Install QGIS binary from Kyngchaos
Homebrew also supports GUI installations. QGIS can be installed using
brew cask install qgis
from the command line if homebrew is installed and configured correctly.
If you do not (want to) use homebrew, you can install the QGIS binary from https://www.qgis.org/en/site/forusers/download.html.
This is exactly the same as calling brew cask install qgis.
If you choose this option, you will get the following error messages during QGIS processing
QSqlDatabase: QSQLITE driver not loaded QSqlDatabase: available drivers: QSqlQuery::prepare: database not open [1] "ERROR: Opening of authentication db FAILED" [2] "WARNING: Auth db query exec() FAILED"
These messages DO NOT affect RQGIS usage.
Try the RQGIS package in your browser
Any scripts or data that you put into this service are public.
R Package Documentation
Browse R Packages
We want your feedback!
Note that we can't provide technical support on individual packages. You should contact the package authors for that.
Embedding an R snippet on your website
Add the following code to your website.
For more information on customizing the embed code, read Embedding Snippets.