Nothing
In rfigshare: An R Interface to 'figshare'
rfigshare - Share and explore figures, data, and publications on FigShare using R

opts_chunk$set(comment=NA, tidy=FALSE, warning=FALSE)
Obtaining your API keys
There is a nice video introduction to creating applications for the API on the figshare blog. The following tutorial provides a simple walkthrough of how to go about getting your figshare API keys set up so that you can use the rfigshare package.
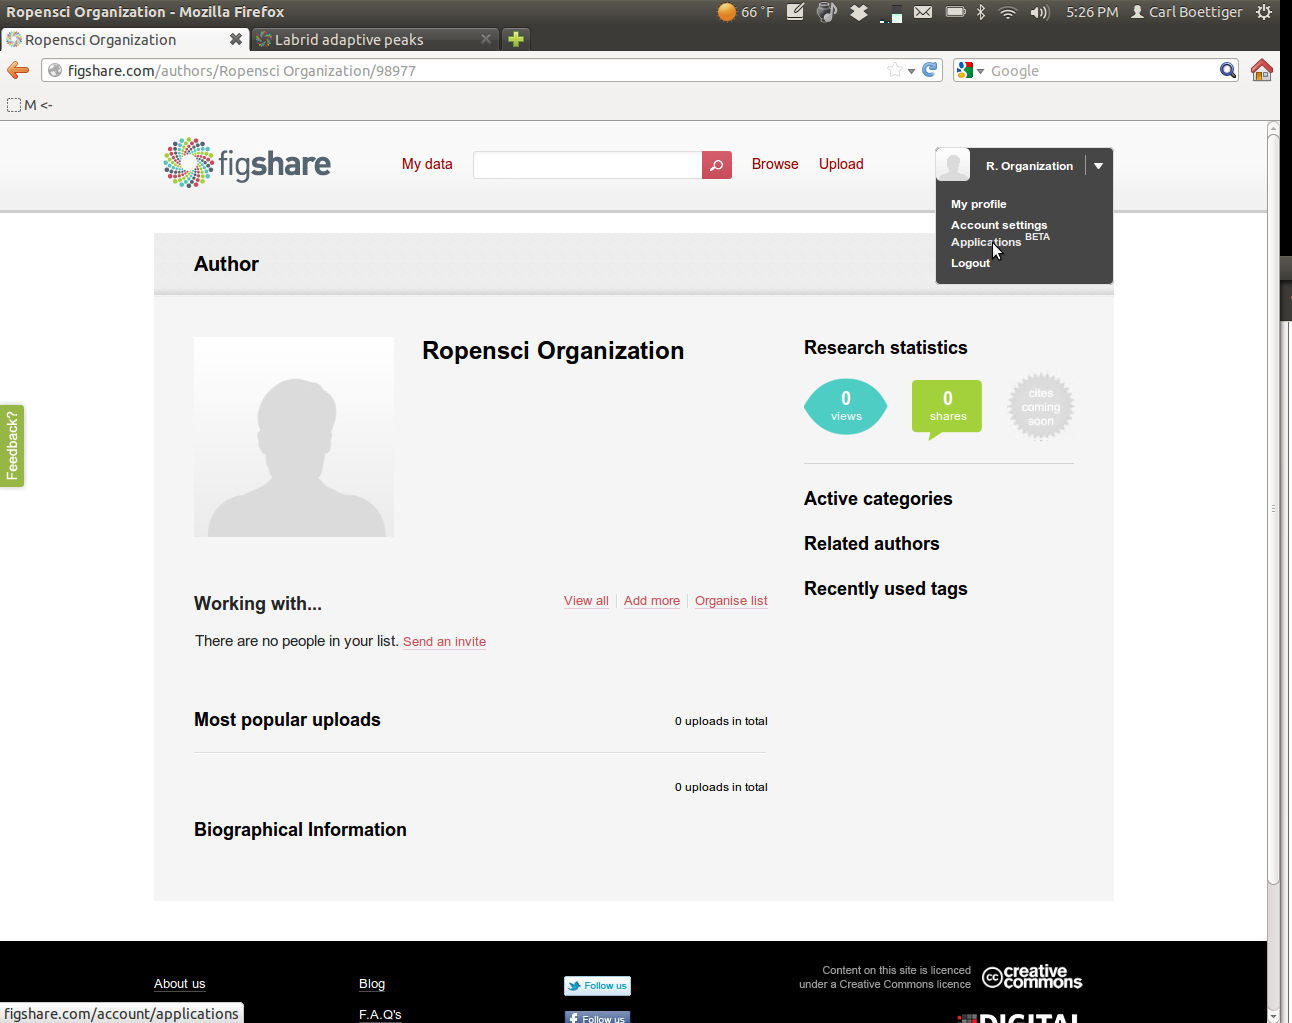
Create a user account on FigShare and log in. From your homepage, select "Applications" from the drop-down menu,
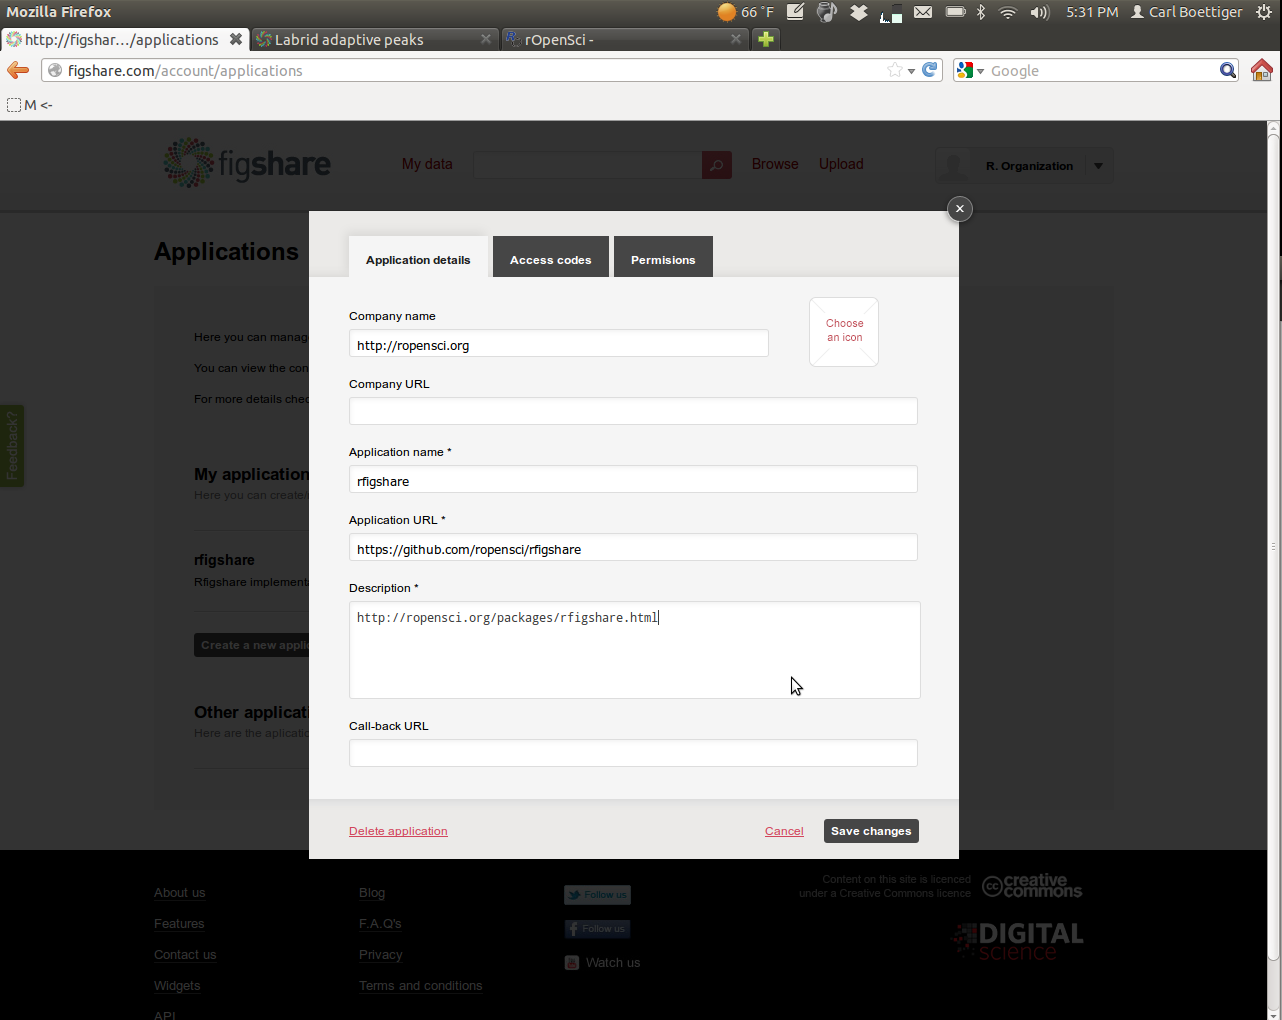
Create a new application:

Enter in the following information:
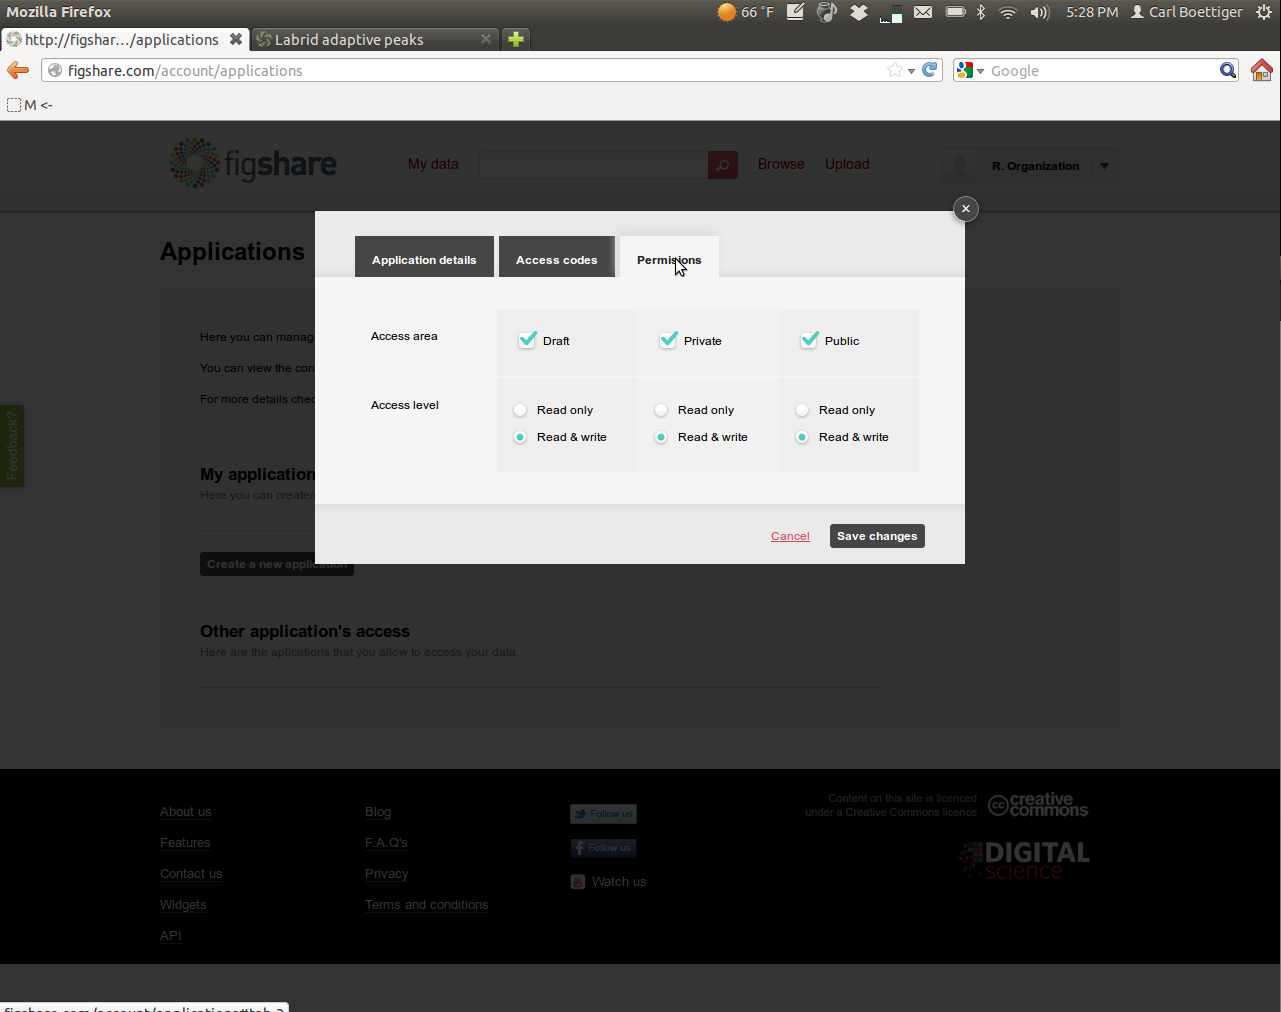
Then navigate over to the permissions tab. To get the most out of rfigshare you'll want to enable all permissions:
Save the new settings, and then open the application again (View/Edit menu) and click on the "Access Codes" tab.

Record each if the keys into R as follows. You might want to put this bit of R code into your .Rprofile to avoid entering it each time in the future:
options(FigshareKey = "qMDabXXXXXXXXXXXXXXXXX")
options(FigsharePrivateKey = "zQXXXXXXXXXXXXXXXXXXXX")
options(FigshareToken = "SrpxabQXXXXXXXXXXXXXXXXXXXXXXXXXXXXXXXXXXXXXXXXXXXXXXXXXXXXXXXXXXX")
options(FigsharePrivateToken = "yqXXXXXXXXXXXXXXXXXXXX")
Installing the R package
Now that we have the API credentials in place, actually using rfigshare is pretty easy. Install the latest version of package directly from Github using:
require(devtools)
install_github("rfigshare", "ropensci")
Using rfigshare
Try authenticating with your credentials:
require(rfigshare)
fs_auth()
````


Try a search for an author:

``` {r }
fs_author_search("Boettiger")
````

Try creating your own content:

``` {r }
id <- fs_create("Test title", "description of test", "dataset")
````

This creates an article with the essential metadata information. We can now upload the dataset to this newly created figshare object using `fs_upload`.  For the purposes of this example, we'll just upload one of R's built-in datasets:

``` {r }
data(mtcars)
write.csv(mtcars, "mtcars.csv")

fs_upload(id, "mtcars.csv")
Not that we must pass the id number of our the newly created figshare object as the first argument. Similar functions let us add additional authors, tags, categories, and links, e.g.
fs_add_tags(id, "demo")
Minimal metadata includes title, description, type, and at least one tag and one category. We can add categories using either the category id or the name of the category, but it must be one of the preset categories available. We can ask the API for a list of all the categories:
``` {r results="hide"}
fs_category_list()
``` {r results="asis", echo=FALSE}
print(xtable::xtable(fs_category_list()), type="html")
And we can add the category or categories we like,
fs_add_categories(id, c("Education", "Software Engineering"))
The file we have created remains saved as a draft until we publish it, either publicly or privately. Note that once a file is declared public, it cannot be made private or deleted. Let's release this dataset privately:
fs_make_private(id)
We can now share the dataset with collaborators by way of the private url.
The quick and easy way
The rfigshare package will let you create a new figshare article with additional authors, tags, categories, etc in a single command usnig the fs_new_article function. The essential metadata title, description and type are required, but any other information we omit at this stage can be added later. If we set visibility to private or public, the article is published on figshare immediately.
``` {r tidy=FALSE}
id <- fs_new_article(title="A Test of rfigshare",
description="This is a test",
type="figure",
authors=c("Karthik Ram", "Scott Chamberlain"),
tags=c("ecology", "openscience"),
categories="Ecology",
links="http://ropensci.org",
files="figure/rfigshare.png",
visibility="private")
# Examining Data on Figshare

We can view all available metadata of a figshare object.  If the object is not public (e.g. draft or private), we have to add the `mine=TRUE` option

``` {r }
fs_details(id, mine=TRUE)
You can see all of the files you have:
fs_browse(mine=TRUE)
Note that we can easily grab the ids with the wrapper function fs_ids:
fs_ids(all_mine)
We can delete unwanted files that are not public with fs_delete:
fs_delete(id)
Try the rfigshare package in your browser
Any scripts or data that you put into this service are public.
rfigshare documentation built on May 10, 2022, 1:05 a.m.
R Package Documentation
Browse R Packages
We want your feedback!
Note that we can't provide technical support on individual packages. You should contact the package authors for that.
rfigshare - Share and explore figures, data, and publications on FigShare using R
opts_chunk$set(comment=NA, tidy=FALSE, warning=FALSE)
Obtaining your API keys
There is a nice video introduction to creating applications for the API on the figshare blog. The following tutorial provides a simple walkthrough of how to go about getting your figshare API keys set up so that you can use the rfigshare package.
Create a user account on FigShare and log in. From your homepage, select "Applications" from the drop-down menu,
Create a new application:
Enter in the following information:
Then navigate over to the permissions tab. To get the most out of rfigshare you'll want to enable all permissions:
Save the new settings, and then open the application again (View/Edit menu) and click on the "Access Codes" tab.
Record each if the keys into R as follows. You might want to put this bit of R code into your .Rprofile to avoid entering it each time in the future:
options(FigshareKey = "qMDabXXXXXXXXXXXXXXXXX") options(FigsharePrivateKey = "zQXXXXXXXXXXXXXXXXXXXX") options(FigshareToken = "SrpxabQXXXXXXXXXXXXXXXXXXXXXXXXXXXXXXXXXXXXXXXXXXXXXXXXXXXXXXXXXXX") options(FigsharePrivateToken = "yqXXXXXXXXXXXXXXXXXXXX")
Installing the R package
Now that we have the API credentials in place, actually using rfigshare is pretty easy. Install the latest version of package directly from Github using:
require(devtools) install_github("rfigshare", "ropensci")
Using rfigshare
Try authenticating with your credentials:
require(rfigshare) fs_auth() ```` Try a search for an author: ``` {r } fs_author_search("Boettiger") ```` Try creating your own content: ``` {r } id <- fs_create("Test title", "description of test", "dataset") ```` This creates an article with the essential metadata information. We can now upload the dataset to this newly created figshare object using `fs_upload`. For the purposes of this example, we'll just upload one of R's built-in datasets: ``` {r } data(mtcars) write.csv(mtcars, "mtcars.csv") fs_upload(id, "mtcars.csv")
Not that we must pass the id number of our the newly created figshare object as the first argument. Similar functions let us add additional authors, tags, categories, and links, e.g.
fs_add_tags(id, "demo")
Minimal metadata includes title, description, type, and at least one tag and one category. We can add categories using either the category id or the name of the category, but it must be one of the preset categories available. We can ask the API for a list of all the categories:
``` {r results="hide"} fs_category_list()
``` {r results="asis", echo=FALSE}
print(xtable::xtable(fs_category_list()), type="html")
And we can add the category or categories we like,
fs_add_categories(id, c("Education", "Software Engineering"))
The file we have created remains saved as a draft until we publish it, either publicly or privately. Note that once a file is declared public, it cannot be made private or deleted. Let's release this dataset privately:
fs_make_private(id)
We can now share the dataset with collaborators by way of the private url.
The quick and easy way
The rfigshare package will let you create a new figshare article with additional authors, tags, categories, etc in a single command usnig the fs_new_article function. The essential metadata title, description and type are required, but any other information we omit at this stage can be added later. If we set visibility to private or public, the article is published on figshare immediately.
``` {r tidy=FALSE} id <- fs_new_article(title="A Test of rfigshare", description="This is a test", type="figure", authors=c("Karthik Ram", "Scott Chamberlain"), tags=c("ecology", "openscience"), categories="Ecology", links="http://ropensci.org", files="figure/rfigshare.png", visibility="private")
# Examining Data on Figshare
We can view all available metadata of a figshare object. If the object is not public (e.g. draft or private), we have to add the `mine=TRUE` option
``` {r }
fs_details(id, mine=TRUE)
You can see all of the files you have:
fs_browse(mine=TRUE)
Note that we can easily grab the ids with the wrapper function fs_ids:
fs_ids(all_mine)
We can delete unwanted files that are not public with fs_delete:
fs_delete(id)
Try the rfigshare package in your browser
Any scripts or data that you put into this service are public.
R Package Documentation
Browse R Packages
We want your feedback!
Note that we can't provide technical support on individual packages. You should contact the package authors for that.
Embedding an R snippet on your website
Add the following code to your website.
For more information on customizing the embed code, read Embedding Snippets.